Common Element Selection Methods
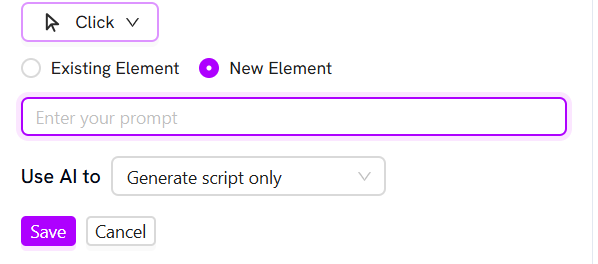
A few aspects remain common for every action. When you select an action (like “Click” or “Input”), you will always be presented with two primary methods for choosing which element to act upon:- New Element: This option uses AI. You provide a text prompt (e.g., “the ‘Add task’ button”) that helps the AI find the specific element on the page.
- Existing Element: This option allows you to select from a list of pre-saved elements that you have already defined.
Note: For complete context on how to create and use pre-saved elements, please refer to the “Using elements” section under Reusability.Here is what these two options look like in the UI:
1. Click
Purpose: Simulates a user clicking on an element. This is the most common action, used for interacting with buttons, links, or any other clickable element. You simply identify the target element (using the common methods above), and the script will perform a click.- Arguments: This action only expects element rendering arguments.
2. Hover
Purpose: Simulates a user moving their mouse cursor over an element. This is essential for testing elements that only appear on mouse-over.- Use Case: Use this to trigger tooltips, open dropdown sub-menus, or reveal “hover-to-show” buttons before you can click them.
- Arguments: This action only expects element rendering arguments.
3. Select
Purpose: Selects an option from a dropdown menu. This action is specifically designed for dropdown (<select>) elements.
- How it works: First, you target the dropdown element itself. Then, you provide the exact text of the option you want to select.
- Arguments:
- Enter a value: The exact text of the option you want the script to select from the list.
4. Input
Purpose: Types text into a form field. This is used for filling out forms, search bars, or any text-entry field.- How it works: You first select the target element (like a username field). Then, you provide the text value you want the script to type.
- Arguments:
- Enter a value: The text you want the script to type into the field.
5. Upload File
Purpose: Simulates a user uploading a file from their computer.- How it works: This is a two-part action. First, you attach the file in the test composer. Then, you select the element on your website (like the “Upload” button) to trigger the upload.
- Arguments:
- File: A dropdown menu to select the file you want to upload.
6. Verify (Assertion)
Purpose: Checks if a condition is true, which determines if a test step passes or fails. This is the most critical action for verifying your application’s state. This action has two primary modes: Page (verifying the URL or Title) and Element (verifying an element on the page).-
Arguments (if verifying a PAGE):
- Select what you want to verify: A dropdown with options: “Verify URL” or “Verify Title”.
- Select check type: The assertion logic (Options: “is”, “contains”).
- Enter value: The expected text for the title or URL.
-
Arguments (if verifying an ELEMENT):
- First, you select the target element using the Common Element Selection Methods.
- Then, you choose the assertion type (e.g., “is visible,” “contains text,” “is enabled”).
-
Common Options (for both modes):
- Fail test on verification failure?: (Yes/No) Choose if this step should fail the entire test if the check is false.
- Expected result: (Pass/Fail) Use this to check for negative outcomes (e.g., “I expect this verification to fail”).
7. AI Script (Custom AI Action)
Purpose: Performs complex or custom actions using a plain-English prompt. If you feel restricted by the standard actions, this is your flexible solution. You can write a command like, “Find the third item in the list and click the delete icon next to it” or “Scroll to the bottom of the page.” The AI will interpret your instruction.- Arguments:
- Prompt: A text field where you enter your plain-English command for the AI to execute.